
|
Solar Cooking Archive: CookingTips, Ideas, foods and more.

Day by day and week by week solar cookers log
Come and join us as we cook (and sometimes not)foods of all kinds Using the power of the Sun.
Share with all of us your Solar Cooking Experiences, Events and Photos
We would like to know all about your Solar Cooking Experiences; successes and failures as well as the cookers you use, whether homemade or manufactured.
Share as much detail as you would like...even submit photos as well.
What Other Visitors Have Said
Click below to see contributions from other visitors to this page...
Rainy days problem solved! 
We had crazy flooding and heavy rain the last few days so I ran out of my home made bread and couldn't get more baked. I try to keep the freezer stocked …
Who needs parabolics?
I've just come up with an idea that negates the need for expensive parabolic type reflectors.
I basically bend light in one plane then fold that light …
Blown away sun oven
I was cooking some chicken and bam along comes a huge dust devil. carried my oven away and tore up the reflectors. However the glass did not break and …
solar cooker roach coach
Is it possible to make a solar cooker oven ect out of a roach coach type vehicle. think about it you drive as your food cooks. just a thought
…
Solar Oven Sun Trackers...First run in the sun.
Finally finished working on my first solar tracker for a Sun Oven and IT WORKS GREAT!
The objective was to make a light weight, sturdy and most importantly …
over cooked roast in a solar oven
I cooked a roast today and for the second time I overcooked it.
I have a digital thermometer that i put on the wrong setting. folks don't set …
Solar Oven Sun Trackers....The Motor and Power Source
After watching a bunch of YouTube videos to get some ideas I found one that was rather interesting. https://www.youtube.com/watch?v=gPFbcQ8i4PE
I …
Solar Oven Sun Trackers
I love my global sun oven, but...one of the biggest issues I have is with adjusting the position every half hour to hour or so for optimal cooking. (Not …
The Sun is back after days of cloudiness...time to solar cook.
Today is our first really sunny day in a while this 8th day of March, and of course out came all of the solar cookers (well, half of them) and we cooked …
Basic Solar Chicken Wings - Easy!
Solar cooking, like any cooking method, takes a little practice. I used a Global Sun Oven in Boston, at latitude 42, to cook this dish - the photos were …
Solar Cooking Instructions Not rated yet
Check out our videos on YouTube that show reviews on the different products, how to install a solar cooker, comparisons between the parabolic solar …
Solar Oven Sun Trackers....Ready for Cooking Not rated yet
Initially I considered using a solar panel to power this tracker, but decided instead to use a rechargeable battery pack from an a portable vacuum cleaner …
A Year of Research Not rated yet
It was a dark and stormy night…when I discovered solar ovens.
I am uncertain how I was brought to this new concept. Was I browsing book titles in the …
Solar Oven Sun Trackers... The new platform. Not rated yet
I was pleased with my first experiment in building a sun tracker for a Sun Oven, but spent way too much time in making the rotating platform.
Then I …
Pictures of my Global Sun Oven and roast Not rated yet
Pics of my 12 year old sun oven and a pork roast dinner.
____________________________________________
We received your pictures, thanks.
Twelve …
After the rains have gone, the solar cookers will come out... and other musings Not rated yet
It was a sunny day and a very productive solar cooking day as well this 14th of September 2013.
We have had about three weeks of clouds and rain, lots …
Orange You Glad You Had A Bit Of Sun? Not rated yet
I went to Fish lake high up in our UT mountains last weekend for a family reunion.
It has been an early and cloudy monsoon season for us this year. And …
Father's Day Solar Cooked Angel Food Cake and Mango Cheesecake Not rated yet
Today is Father's day and my wife has been wanting to do a Mango Cheesecake in the Sun Oven since the time we first tried it three years ago when Jackie …
US Solar Survey: Participants Needed (February 2013) Not rated yet
If you live in US and have been solar cooking for at least 18 months, and are interested in being a solar cooking survey respondent, please email me at …
January 2013 Solar Cooking...bugers, clam chowder, muffins... Not rated yet
Saturday (Jan 05th 2013) was a bright, sunny and cold day, but perfect for solar cooking.
I just can't stand to see all of that sun going to waste and …
Autum Solar Cooking Class-October 2012 Not rated yet
This past Saturday, 20th of October, we had our monthly solar cooking class to which we had about 13 attendees and lots of food to sample.
We cooked …
Solar Cooking Class May 19, 2012 St. George UT Not rated yet
A dazzling display of Solar cookers were seen at our Monthly 3rd Saturday Solar Cooking Class on May 19, 2012. We set up our arsenal of 4 Parabolics, 2 …
October 2008
Solar Chocolate Cake
Solar Roasted Whole Chicken
Solar Grilled Onions
Solar Baked Cinnamon Apples
Solar Refried Beans
Solar Cooking Dried Beans..oopps
Solar Yellow Cake
Solar Cooked Bacon
Solar Baked Salmon
Solar Baked Potatoes
Solar Roast Beef
Fall Solar Cooking Class
Butter Herb Rice...OOpps
Solar Cooked Wheat Bread
Solar Cooked Chili
November 2008
Solar Fried Eggs
Solar Peach Cobbler
Hot Dogs and Baked Apples
February 2009
Oatmeal on our new Parabolic Solar Cooker
March 2009
Hot Dogs, Beans and Popcorn on the Parabolic
Taco Soup in the Hot Pot Solar Cooker
Au gratin Potatoes in the Tulsi
Warming up food and Making Tacos
April 2009
Cookies,sweet rolls and bread
Frozen Chicken and dehydrated potatoes
Refried Beans Deluxe, Grilled Onions, Corn Bread and Peanut Butter Cookies
Pork Chop Stew and a Steamed Lobster
Gingerbread Cookies and Homemade Burritos
Wheat Bread (Three Loaves at a time)
May 2009
Shepard's Casserole
Solar Cooked foods of all kinds
June 2009
Hamburger Gravy, White Bread, Pork for Taquitos
Corn on the Cob,Brocolli, Cualiflower,Onions, baked cinnamon apples
Fried Taquitos
July 2009
Chicken, Wheat Bread, Blueberry Quick Bread, Biscuits and Gravy and more...
Birthday cake, soups, tacos, macaroni and cheese,beef stew, oatmeal raisin cookies
August 2009
Marinated Beef Roast, Lasagna, Potatoes and more(condensed version)
Standard Class/demo Fare and Whole Ham, Bundt Cake, Potato Salad
October/November 2009
Beef stew and Halloween Pumpkin
November/December 2009
Pot Roast, Shepard's Casserole,and more...
June 4-8, 2013
Super Solar Cooking Week
Solar Cookers B (log)
Wednesday October 1st, 2008
St. George, Utah
Elevation 2800 ft. above sea level
High Temperature 87° F
Today I was up at 5:00 AM in order to get to my first account for my cleaning business.The sky showed a few fluffy clouds far to the south on the horizon.The temperature was nice and invigorating for this time of year, a nice cool 59° F.By 10:00 AM I was finished with my day’s first work and was able to start preparation of the food for today’s solar cooked meal. I prepared a chocolate cake mix from a box; mixing up the ingredients per the instructions and then coating, with cooking spray and a light dusting of flour, the black roaster pan that came with my SOS Sport Solar Oven. I then poured the cake batter into the pan.I did not put the lid on the pan since it is not necessary.(Sometimes we will make cake from scratch and sometimes from the box depending on desire and time constraints)
I took the cake to the solar oven and placed it inside, the temperature was at 350° F.The instructions on the box showed cook time of 40-45 minutes in a standard oven.(I usually set my timer for the stated amount of time and then when it beeps I will go and check on the status of the food and then usually calculate from there how much more time is needed if any.)
I quickly lifted the cover to the solar oven and checked the doneness of the cake by inserting a knife and could see that it lacked a bit more time; on the surface the cake looked normal and cooked, but the knife test showed the true status.
I set the timer for another fifteen minutes, allowed it to cook longer and then pulled the cake out and let it cool inside the same pan, uncovered.My wife later on pulled it out of the pan, cut it in half and put sweetened condensed milk on the bottom layer, added the top layer and perforated the top with holes and poured more sweetened condensed milk over the top and then put a homemade cream cheese frosting over the whole cake.
The cake tasted as good as a cake from a traditional oven.
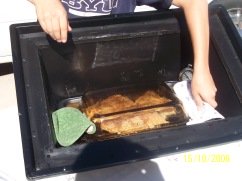
While the cake was cooking, I pulled the whole chicken out of the refrigerator which I had placed there three days earlier to thaw.I rinsed it and then sprinkled a season salt mixture for chicken and fish that I picked up at a dollar store in order to try it.
The seasoning has quite a good flavor, but I found later that I should have put more on than I did because when it was cooked I really couldn’t taste very much of the seasoning flavor.I sprinkled season salt inside the cavity of the chicken also.I then placed the chicken inside the other dark roaster pan that came with my SOS Sport Solar Oven and covered it with the lid.I had already placed my Sport solar oven outside to cook the chocolate cake.When I placed the chicken in the solar oven the temperature was at about 350° F.The time was about 11:00 AM left the chicken to cook and I checked the temperature about an hour and a half later.
By this time the cake was done and I had removed it from the solar oven. I did not have any concerns of having a chocolate cake with the flavor of chicken since the chicken had not yet started to give off its aromas.
After having initially fallen a few degrees to about 250° when placing the chicken inside the oven, the temperature had risen back to about 300° to 320° where it remained the rest of the cooking period, I then adjusted the solar oven towards the sun and did not check on the chicken for about another hour and a half.
(In the fall, winter and spring periods I will adjust the angle or direction of the solar cooker a little more often since the sun is lower on the southern horizon. In the summer this is not needed quite as often.)
While the chicken cooked I busied myself with my other chores and obligations.
I left the chicken to slow-low cook until about 4:30 PM (adjusting the position of the oven every hour) when we then served it with the rest of our meal of green salad and fresh cut cantaloupe.
When I opened the cover of the pan for the first time since placing the chicken there earlier in the day , a cloud of steam rose from the pot and to our delight we beheld a dark brown skinned roasted chicken similar to the kind you pull out of a traditional oven.
As I tried to cut into the chicken with a carving knife, the wings just fell off of the body, so I just resorted to pulling the chicken apart with a fork.All of the meat literally fell off of the bones, no need for utensils.The only thing I determined I would do differently next time is to do a better job of seasoning or marinating the bird.The surface seasonings on the outer skin did not penetrate to the inner meat like I would have preferred.The rest of our meal consisted of homemade wheat bread (cooked previously) and green salad.
Solar Cookers B (log)
Wednesday October 8th 2008
St. George, Utah
Elevation 2800 ft. above sea level
High temperature 86
Today when I got up the sky was completely clear, not a cloud to be seen.I was expecting a student from my Solar Cooking Class to arrive at 11:00 AM for the third class of a five class course.We decided to do it at my house and to combine the third and fourth week since the previous Saturday we were not able to hold class due to a very rainy day.
I began preparing the ingredients for the two dishes that I had decided to make for the class.These were going to be straight vegetable-fruit dishes,since my student (Patricia) did not eat much in the way of meat.I set out one of my Hot Pot Solar Cookers with a tablespoon of canola oil in order to preheat the oil and cooker.
I like to grill onions and add them to a variety of meats or just eat them as they are.So I decided to do grilled/sauteed onions in the Sport Solar Oven.I also wanted a dessert to go along with this, so I decided to do cinnamon apples, or rather apple pie without the crust.Patricia also wanted me to try some bread made from grain sprouts, rye in this case, so I purchased a small loaf of this bread at the Health food store in town.They call this bread; “manna bread”. And the hefty price indicated that it probably did come by way of celestial delivery.
After thawing the bread we cut off four slices and placed it in the Hot Pot lying along the sides of the pot and then placed it outside in the reflector panels.(We decided to use the pot rather than a cookie tray since the solar oven was going to be used for other foods.)
We then peeled and sliced three apples (Jonathans) and placed them in the black roaster pan and added a half cup of water and some sugar and ground cinnamon (to taste).We then covered the pot and placed it in the Sport oven and placed the cover on it.The temperature after preheating stood at 325° F. by the time we put the apples in.
We then returned to the kitchen and Sliced up two medium sized onions and place one and a half of these onions into two small black enamel bowls(no lids) that we had picked up at a camping supply store.I then put about one teaspoon of canola oil, a pinch each of dry oregano, dry basil and salt and black pepper along with a sprinkle of sweet paprika into each bowl of onions.
I then went and placed the bowls into the SOS Sport solar oven alongside the apples and re-covered the oven and placed the solar reflector panels on the oven for maximum heat potential. The temperature had now declined to just under 300° F.
I then retrieved the “manna bread” and took it into the kitchen where we ate some warm, tasty and toasted bread slices.I then took the half onion, and placing this into a food chopper/dicer along with three cloves of garlic, I diced both of them to a fine mix.I then retrieved the second Hot Pot solar cooker with the oil from outside where it had been preheating.I added the onions and garlic to the pot along with a teaspoon of oregano, basil, paprika, salt and pepper in the same way I had done with the onion dishes earlier.I then placed the covered pot back into its reflector panels and allowed the mixture about twenty minutes to cook and to brown.After the ingredients were browned and softened I then added two cans of re-fried beans to the mixture and stirred until all was well mixed.I then re-covered the pot and repositioned the solar cooker for greatest sun exposure.The re-fried beans were then left to slow cook for the rest of the day, or till 4:30 PM when my family and I ate our re-fried beans with fresh salsa and cilantro, sour cream and guacamole, using tortilla chips for scoops.
After two hours of cook time we retrieved the apples and the onions which had cooked at a constant temperature of just under 300° F.The onions were sweet and tender and the apples were soft and juicy. (My way of eating apple pie without the crust)My student (Patricia) was quite pleased with the flavor and the texture of both.
Friday October 10th 2008
St. George, Utah
Elevation 2800 ft. above sea level
High Temperature 72° F
The temperatures are expected to be a bit cooler today with winds picking up in the afternoon due to a low front expected by Saturday with rain forecast on that day.As for today it is bright and sunny, perfect for a bit of solar cooking.At 12:30 PM I took my reflectors for my Hot Pot and set it out on my driveway facing the sun and then brought the Hot Pot with red beans and set it in the reflector panel.
The red beans I had placed in the pot the day before with water in order to let them soak overnight, in the same way you would do so if cooking beans using the traditional method.
I also set out my Sport Solar oven (without reflectors) at the same time I set the other cooker out, in order to preheat the solar oven.I then used a box cake mix (yellow) and following the directions on the package mixed the batter and then poured it into a dark (smoke color) glass cake pan that had been greased with cooking spray.
I then placed it inside the Sport solar oven and noted the temperature at about 300 F.I set the timer for the suggested time on the box at 34 minutes even though I was sure that I would need to add more time later. I like to do this just so I can see what cooked stage the food has reached at the traditional marked time.
When the timer sounded I checked the cake and noticed that The temperature had dropped to about 250° inside the solar oven.The batter had started to firm up but it still looked a bit liquid.I then set the timer for 16 minutes more.
When I checked again at the timers ring, I noticed a much firmer batter but there were still liquid looking bubbles on the surface so I reset the timer for 10 more minutes. The temperature remained at just below 250° F.I set the timer for ten more minutes and checked again whereupon I set the timer again for ten more minutes and this last time I noticed that the edges of the cake were very lightly browned. I inserted a knife to check for doneness and found it to be just right.I brought the oven with the cake inside and let it sit for about two minutes and then opened the cover.The cake was just right. I set it on the counter to cool.
Because the cake was in a lighter colored cake pan as opposed to the black roaster pan and the fact that it was a lighter colored cake and also the fact that the temperature was a bit cooler today the cake probably took about 10-15 minutes longer than it may have under different circumstances and conditions.In all it took about one hour and twenty minutes to cook the cake.I did check on the status of the cake a bit more often than I usually do in order to have a more detailed documentation of the whole process and the efforts involved.
(We ate our cake with frozen/thawed (fresh picked) peaches and whipped cream that we had preserved earlier in the month.)
As you gain more experience with solar cooking you will learn to gauge and calculate cooking time with more accuracy.Solar cooking, like many other disciplines or arts, is not a 100% exact science.
The red beans ended up cooking for about three and a half to four hours and were still not completely cooked.I finally brought them in and put them on the stove and had to cook them for another three hours or more at a steady, slow boil. These beans were harder than usual.
This is the first batch of dry beans that I have not been able to cook within a somewhat reasonable time frame.
I had previously cooked dry beans in a solar cooker within a three to five hour span with out any problem. The previous beans that I cooked without a problem were a mix of pinto, white, small red, and what I believe is an Anasazi bean. These always cook without much difficulty.
I figure that some of the factors affecting today’s red beans were the age, (in storage since 1989) the ambient temperature outside was a bit cooler, and UV rays were not as intense due to the time of year.
I will again attempt to work out a more efficient means of solar cooking these same red beans at a later day.
Solar Cookers B (log)
Tuesday October 14th 2008
St. George, Utah
Elevation 2800 ft. above sea level
High Temperature 72° F
Today started out quite crisp and cold for St. George at this time of year.Normally it is not this cool quite so quickly, but because a cold front came out of the north over the weekend our low temperature this morning was only 45° F.
The sky is clear today with only the slightest of breezes. Today we will see how to cook with the ambient temperatures much lower than what we are accustomed to in the summer time.I decided I wanted to cook up some bacon in order to make some BLTs for dinner.This is not a major endeavor or use of the capacity to solar cook since the bread is already made and the tomatoes need no cooking but I thought it would be nice to show how easy it is to cook bacon in a solar cooker.
In the past I have cooked bacon in my Hot Pot by just tossing the bacon into the bottom of the pot and allowing it to cook in a mass of pork, while stirring it every two to three hours.I usually use this for the ingredient in my baked beans recipe.It takes about five hours this way and since I usually am in no hurry I just let it go and forget about it.

Today I am going to put the bacon into the SOS Sport Solar Oven and use a blackened (dark) cookie tray.I thawed the bacon in water and then separated the individual strands in an even flat manner on the tray.I had previously placed the solar oven with solar reflector panels to pre-heat. When the temperature had reached about 275° F I placed the bacon into the oven.Outside temperature was 55° F.And the time was 11:15 am At About 12:10 I adjusted the oven towards the sun and noted the temperature was still at 250° F
At 1:20 I went and checked the bacon and I will have to admit I had gotten busy and forgot to go check earlier and I found my bacon all cooked; cooked to a crisp.Not burnt, but crispy.

I like it that way, my wife prefers it a bit softer.The oven temperature when I pulled the bacon out sat at 300° F.I then set another tray of bacon in to cook and then went about my other duties.I set the timer this time for about an hour and ten minutes.When the timer chimed I went and found this slightly smaller batch of bacon completely cooked to the state of the first batch. The average cooking temp ended up being about 300° F.The quicker cook time is due mainly to the more intense UV rays of the sun at this particular hour of the day.
Now we're ready for BLTs and fresh fruit for dinner this evening.
Return to Index
Wednesday October 15th 2008
St. George, Utah
Elevation 2800 ft. above sea level
High Temperature 77° F
The day started out with clear skies and a morning low of 50° F
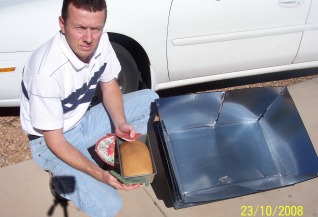
Today we decided we would like to do some fish in the solar oven, salmon in particular.This will be accompanied by baked potatoes.I also wanted to cook a roast for our meal tomorrow; we are going to shred it and use it for Chimichangas.
At about 10:15 I set the Hot Pot out in the sun with a small amount of chopped onion and some crushed garlic, salt and pepper and about four cups of water to pre heat.At 10:45 I placed the beef roast into the water inside the Hot Pot and re-covered the pot.
At 11:30 I set the Sport solar oven and the Tulsi Hybrid Solar oven (this oven manufactured in India) out to pre heat.
In the meantime I scrubbed seven medium sized potatoes and placed them inside of the covered, darkened pots that came with my Tulsi Solar Oven and left them on the counter.At just before 1:00 pm I prepared the salmon on one of my dark cookie trays by placing slivers of onions, seasoned salt for seafood and ground black pepper with a smattering of lemon juice all on the tray itself, whereon I lay the three medium size cuts of salmon, skin side down. I then garnished the pink side of the salmon with slivers of onions, seafood season salt, ground black pepper, garlic powder and more lemon juice on top.I then covered the salmon with a smoke colored glass cake pan to create a glass domed seal.
I then placed the salmon inside the Sport solar oven whose temperature showed 250° FI also placed the potatoes inside the Tulsi hybrid solar oven.I then placed the reflector panels on both ovens for increased concentration of the suns rays.
Just after 2:00 pm I checked on the various ovens and their contents and noticed that both ovens had regained their small loss in temperature when the food was originally placed inside.They were both at about 265 F.I knew the potatoes still lacked cooking time there fore I did not check them and the salmon I could see through the glass cover and noted that the juices were boiling.The beef roast, which is now boiling, I will leave until about 4:30 pm to allow it to continue slow cooking.The salmon though will be ready in about fifteen more minutes.
At 2:30 I went to retrieve the salmon and found it still bubbling at 250 F.The fish looked slightly toasted on the edges and the aroma was wafting through the air up to our front door fifteen feet away, even before opening the solar oven.I pulled the salmon out so as not to over cook it and about a half an hour before eating I returned it to the solar cooker to heat it up a little more.
The potatoes were taken out of the oven at 4:00 pm. This is probably a bit longer than some people would prefer but I like my baked potatoes well done. Usually two hours is long enough for potatoes if you do not over fill the solar cooker otherwise it will take longer.The beef roast I brought in at 4:20 since the sun’s potency is much less at this time of the year. The roast is completely cooked even though I like to leave it longer when I can in the summer time in order to have it a little bit more tender.
Some may wonder why I cooked the salmon so early before the actual dinner time.
I usually do it to get things finished earlier when I have other things I need to tend to during the day. All I do is pop the fish back into the solar oven to reheat it just before serving it, usually about a half an hour before eating.(* Remember that it is very easy to overcook fish and dry it out; something I have done a few times.)
The other part of the reason for doing so is that in the fall through spring periods, the ideal cooking periods are usually a bit shorter than in the summer.
Well, time to eat. Later
Saturday October 18th 2008
St. George, Utah
Elevation 2800 ft. above sea level
High Temperature 83° F
Today was a big day for solar cooking.
The day started out cool due to some high overhead cloudiness which did not let the sun warm things up as quickly as when there are no clouds.The forecast predicted high clouds in the morning giving way to sunny skies by the afternoon.
We had our last cooking class of the season scheduled for today at (Vernon Worthen Park); the main park in downtown St. George.
The city gave me a permit to do my cooking class there as part of the Community Education Program, with which I am associated.
I spent most of the day before, and into the night, preparing all of the equipment, information and food ingredients for the class.
I was to provide a complete solar cooked meal for the students in order to show the different cookers and how they work, the food varieties that one can cook by means of solar energy and the feasibility and ease with which one can accomplish the task.
My wife and daughter accompanied me in order to help with setup and preparation and all other tasks that needed to be done while I instructed the class.
On the menu for the class luncheon was: steamed broccoli and cauliflower florets , refried beans with fresh salsa and guacamole served using white corn tortilla chips, grilled seasoned onions, baked cinnamon apples, and natural peanut butter cookies.(Many of these items you can find within the step by step recipes of our solar cooking site recipes page)
The class was scheduled and planned for members of the Vegetarian Society of St. George, Utah, so the menu was formed with a vegetarian group in mind.The organization has many members who are interested in cooking natural and healthy foods using alternative methods such as solar cooking.The purpose of the class was to show all participants just how easy and practical it is to cook using this method.
I found out during the class that not everyone who attended belonged to the Vegetarian Society, but no one had any qualms with the food since most were very in favor of healthy dishes and meals.
The class ended up having more people than had originally voiced interest, in all there were about fifteen participants that received instruction and some good solar cooked food.
We arrived at the park at 10:00 am to set everything up and to get the cookers heated and to get some of the first ingredients cooking and browning.Due to the time constraints involved in solar cooking, we had most of the ingredients and dishes’ cooking before the class participants arrived since the class duration was for a length of only two hours.
The class started out with some formal introductions to solar energy and solar cooking principles, cooking tips and ideas and how solar cooking is being used world wide to help many of the world’s poor.
After this segment of instruction the class was conducted more informally while observing the solar cookers and their ingredients along with question and answer sessions the remainder of the class period.
It was evident that all the participants were quite excited by the idea of cooking their own meals by utilizing the power of such and abundant free resource as the sun.
While the class was going on my daughter baked the peanut butter cookies in my Tulsi brand solar oven and, after we had a couple of plates full ready, we passed them around to the class members to sample.Everyone thought they turned out very good, even the youngest class participant, and a ten year old girl who had accompanied her grandmother and mother to the class.
At about 2:30 pm we opened all of the solar cookers (six all together) and let everyone serve themselves with whatever they desired to eat.There was more than enough for everyone, much to my relief, and everyone ended up quite satisfied.
The remainder of the time was spent conversing, eating and asking the instructor an endless array of questions on the how’s, why’s and what’s of solar cooking.
Several of the participants were enthused with the idea of coming to the spring class that I will be offering as part of the Community Education program in March of 2009.
The day couldn’t have turned out nicer.The high thin clouds had burned off and it was actually a pleasant sunny day with a balmy 83° degree high temp. A Great day for cooking in the Sun!
For some photographs of the event go to our solar photos page on this site.
Tuesday October 21st 2008
St. George, Utah
Elevation 2800 ft. above sea level
High Temperature 82° F
Today started out nice and clear with moderately cool temperatures in the morning.
I had decided upon cooking a rice dish that I often do, which I call “Mild Butter Herb Rice”.
I had cooked this rice before in the summer time and it turned out pretty good, with the small exception being that I cooked it just a little too long and it turned out slightly more soft and not as firm as I like.
I set my Hot Pot Solar Cooker out to preheat with four cups of water, in order to boil the water ahead of time.
I used my second Hot Pot to cook, or brown, the diced onions, garlic and green bell pepper in margarine along with the other dry seasonings.
I had determined that I would put the rice in to cook shortly before my wife was to arrive home from work, at about 3:00 pm
*Needless to say this was not the right thing to do with a dish such as this in accordance with the time of the year and the location of the sun in the autumn sky.
Since I had placed my water out so early, I let the water in my Hot Pot boil down until there was not enough for what the recipe called for, so I put more water in and reset the cooker toward the sun to boil again.
Because it was after 2:00 pm the new water never did have time to reach the boiling point again.
At 3:00 pm I put two cups of white rice into the onion, pepper, garlic mix, that had been sautéed earlier and which was still hot, and then poured the hot water in and covered the pot.
I set the timer for twenty minutes and when it rang went to check the rice.It was still very much just rice and water, so I set the timer for another twenty minutes and again checked the rice when the timer rang.Again I found that the rice had not cooked much, so I adjusted the solar cooker and inclined it with a greater angle towards the sun and reset the timer for twenty more minutes.
By then my wife had arrived home and, for the first time cooking my rice in a solar cooker, I did not have the meal ready for her arrival.
I had to bring it in and put it into our rice pan and finished cooking it on our stove top.
I had gone against the conventional wisdom and knowledge of solar cooking by trying to cook outside of the prime cooking window of time for a dish that requires a short yet intense cooking level and temperature.
I should have cooked my rice somewhere within the 12:00 to 2:00 pm time frame which is more suitable for this time of year.
Yes, I would have had cooked rice earlier than our scheduled dinner time but I could have maintained it in the warming solar cooker or even re-warmed it just before the meal without any adverse effect on the quality of the rice dish.
I guess this experience was just another reiteration of a cooking rule that I should have known to obey from the beginning.
Live and Learn.
Thursday October 23rd 2008
St. George, Utah
Elevation 2800 ft. above sea level
High Temperature 72° F Today started out quite nippy for this time of the year due to a cold front that came down out of the north overnight. The low was 46° F overnight.
I wanted to try and cook wheat bread in my Sport Solar oven since my Tulsi oven does not have the height to do so.
I am a big fan of homemade wheat bread and I like to do it as natural as possible, and from scratch.
I set my oven out to preheat at about 11:20 am.I then proceeded to mix up the ingredients according to my favorite wheat bread recipe I acquired from a friend.The whole procedure, from start to finished baked loaf, takes about one and a half hours.
After mixing the dough I formed it into loaves and then covered it with a kitchen towel and set it near a window so that the warmth of the sun would allow it to rise adequately.
It took about thirty minutes to raise the dough.
I then took a loaf of bread at about 12:40 pm to the solar oven and quickly placed it inside and set the reflector panels on the oven and directed it towards the sun.
The temperature sat at 325° F when I place the loaf inside.
I then set the timer for 30 minutes. (I check more often for documentation purposes only)
When I checked on the bread at thirty minutes it looked firm but had not darkened in color.
The temperature was at a steady 265° F now.I reset the timer for another 30 minutes and went back to my work.
When the timer sounded I noticed the bread had taken on a golden brown color.
I retrieved the bread and the oven and brought it inside where I took the loaf out of the pan and covered it with a kitchen towel.
The texture and consistency of the bread was the same as a loaf out of our conventional oven.
Solar ovens are great for most any baked good or pastry you can imagine.
Thursday October 30th 2008
St. George, Utah
Elevation 2800 ft. above sea level
High Temperature 82°F
Today started out very nice, the low temperature was a mild 52° F, nice for this time of year.
I decided to make a Chili today for an activity that I am having on Saturday.I noticed on the weather forecast that it was going to be cloudy over the weekend so I felt it would be a good thing to cook up my chili now since today is perfect for some solar cooking.
*Since the ideal cooking time is reduced at this time of the year I decided I would condense my ingredient preparation time and efforts a little bit by using both of my Hot Pot solar cookers.
At about 10:00 amI set one cooker out to pre heat and then I went and pulled my ground meat (one pound) and precooked pinto beans (about five cups) from the freezer and put them in some warm water to thaw.
I opened two regular size cans of tomatoes, one was crushed tomato puree and the other was a can of whole tomatoes, which I ran through the blender just enough to chop it up a small bit, but not too fine like the puree. I like to have small chunks of tomato in my chili.I poured both of these into the other Hot Pot and then added about half a can of water from each can into the tomatoes.I then added a tablespoon of Salt and two beef bullion cubes.This simple recipe calls for two packages of Chili seasoning, but I only use about one and a half packages so as not to be too overpowering.I then add about three to four tablespoons of dried chopped onions to give it extra flavor.I then stirred in the thawed beans and mixed well the whole concoction.
At about 10:20 am I put my thawed ground beef into the pre-heated Hot Pot solar cooker and set the timer for abut 20 minutes.
I then placed my Hot Pot with the tomato and bean mixture into its solar reflector panels at 10:30 am and positioned it towards the sun.
When the timer rang I went and quickly stirred and chopped up the ground meat into small chunks and then re-covered the solar pot and repositioned it towards the sun and set the timer for another 30 minutes.
At about 12:00 pm the timer sounded and I found my ground meat to be completely cooked so I chopped it up into even smaller pieces with my two wooden spoons, (wood in order to not scratch inside of pot) and then I poured out the excess grease.
I then took the meat and stirred it into the main chili and bean mix along with about an extra teaspoon of salt and the re-covered the Hot Pot and repositioned it towards the sun.
(*By using both solar cookers at once I was able to save time by cooking the meat at the same time the rest of the ingredients were cooking. The meat has to be browned (cooked) be fore adding it to the chili or stew or spaghetti sauce etc.)
From this time forward I slightly adjusted the position of the cooker about every forty five to sixty minutes and I stirred my mixture only one more time during the cooking process, since it is not necessary to do so very often.You want to leave your pot covered as much as possible in order to retain the higher heat and not loose cooking time.
I allowed the chili to cook until 3:30 pm wherein by this time it was bubbling and boiling quite steadily. I then brought it inside the house to cool before placing it in the refrigerator for later use.
Monday November 3rd 2008
St. George, Utah
Elevation 2800 ft. above sea level
High Temperature 68° F
Solar Fried Eggs It seems like fall is officially here now that we are into November.A nice, heavy rain storm over the weekend ushered in the cooler weather that is more than likely here to stay.
But that does not mean that the solar cooker has to be stored away for the winter, it only means we do our cooking a little differently.
Today started out with some high thin cloud cover and by the time I arrived at the house most of it had burned off.I decided I wanted to cook up a little bit of breakfast food for my brunch which ended up being my lunch after all.
I set my Sport Solar Oven out at 11:30 am, with two small black enamel bowls and a small slab of butter in each one in order to pre heat the oven and melt the butter.
I set the timer for about thirty minutes so that the oven would heat up to a good cooking temperature.
It was about that time that some more, high, thin clouds decided to complicate my cooking schedule.
I didn’t worry too much because I could see that the cloud cover wouldn’t last very long, but my oven did take until about 12:40 pm to reach 265° F
I went to pull the bacon out of the refrigerator and found out that we no longer had the bacon that had been there a few days earlier.So I decided that I would just have eggs and milk with some toast.
I cracked two eggs into two small bowls and added salt and pepper to taste and then took them out to the waiting solar oven.
I uncovered the oven and quickly poured an egg into each enamel bowl and the re-covered the solar cooker and placed the reflector panels on top and directed the oven towards the sun.(I did it this way so as not to take too much time cracking the eggs over the heated bowls with the solar oven uncovered and losing heat.)
I set my timer for five minutes and when it rang went and checked on the eggs, it looked as if they still lacked a little cook time so I reset the timer for five more minutes.I noted that the temperature remained at about 250° F
When the timer rang I noted the cooking temperature was at 265° F, I then brought the solar oven inside and took out the pans and after cutting into the egg with my spoon realized; that ten minutes was more than enough time, the eggs were a bit overdone and somewhat dry, but still tasty.
Next time I will make sure to cook them about seven minutes, maybe slightly less.
I think in the next couple of days I will attempt a peach cobbler that I have wanted to do for some time now.
Thursday November 6th 2008
St. George, Utah
Elevation 2800 ft. above sea level
High Temperature 58°F
Today is the day to try out a recipe that my father uses for his Dutch Oven Peach Cobbler. But I will be doing this one in my SOS Sport Solar Oven.
Today is a lot colder because of the cold front, so we will see how much the ambient temperature will affect cook time for this dish.
I set the solar oven out to preheat at 10:45 am; the outside temperature was 47° F.At this time of the year it is always a good idea to use the reflector panels to maximize the effectiveness of the oven.
I then proceeded to mix the peaches with the other ingredients.For this recipe I used bottled peaches that we had preserved the year before.
After mixing up the peach cobbler base I put the blend into a darkened or smoke colored glass cake pan and carried it out to the solar oven and quickly put it in and re-covered the oven.The temperature of the oven had reached 300° F at 11:50 am when I put the mix in the oven.I set the timer for thirty minutes and proceeded to make the crust mixture for the cobbler.
(Some people will prepare and put together all of the ingredients at once and cook the peaches and the crust as one.
This method works great in a Dutch or conventional oven but I prefer to cook the peach mixture separately and then put the crust on after about 45 minutes, in this way the crust cooks better and does not turn out so doughy.)
After the thirty minute timer I went to see how the peaches were doing and noted the temperature had dropped to about 225° F due to the size of the dish and the very moist content of the peaches.I reset the timer for another thirty minutes and set about doing other tasks.
Just before the timer sounded I retrieved the peaches and then put the dough mixture on top of the peaches and then set it back in the oven at 1:15 pm and set the timer for 30 minutes. The temperature sat at 212° F At 1:45, on the sound of the timer, I checked and noted that the crust was set and just slightly browned. I adjusted the oven towards the sun.Another thirty minutes, and the cobbler crust was more firm and a bit browner. The temperature remained at 212° F
I allowed the cobbler to remain in the oven until about 2:15 when I brought it into the house and set it on the counter to cool. The cooking temperature had reached 250° F after the crust had firmed up and the moisture content was not quite as great.
Later that evening we had peach cobbler and vanilla Ice cream for dessert.
** You can use any peach (fruit) cobbler recipe that you would like, there is no special kind for solar cooking. I illustrate the steps above to show the method of cooking using a solar oven since it is a little different than using a conventional oven.
Saturday November 8th 2008
St. George, Utah
Elevation 2800 ft. above sea level
High Temperature 69° F
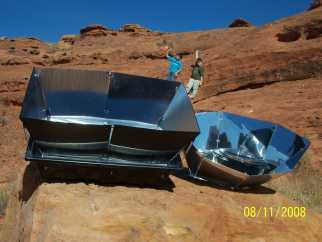
We decided today that it was a perfect opportunity to take advantage of the nice weather we are having and to go spend some time in the red slick rock hills just above St. George by doing some hiking and having a picnic.Of course this meant that we would cook our food in the solar cookers while were out enjoying the scenery and the beautiful day.
We decided though, that we did not want to do anything very involved or time consuming so we decided on cooking hot dogs ( our kid’s choice) with lots of toppings or condiments for my wife and I (to kill the taste of the meat).We also decided to do a favorite dish of ours, and that is baked apples and cinnamon, (my pie without the crust). The Hot Dogs were placed into our Hot Pot and the cinnamon apples were peeled and cut at the house before we left to go on the picnic.I then added the seasonings to the apples and placed them in the black pot and put them outside on our front lawn at about 11:00 am. to start the cooking process.
A five minute drive brought us to our destination at about 12:30 pm where we set the Hot Pot inside its solar reflector panels and set the Sport solar oven with the apples next to it to continue the cooking process and then we went hiking and exploring.
We came back to the van at about 2:20 pm and sat down to a simple solar cooked meal that took little effort to prepare, and all ended up satisfied.
Saturday February 14th 2009
St. George, Utah
Elevation 2800 ft. above sea level
High Temperature 49° F
Greetings and Salutations after a long lay off.
... Well not really.
Those of you who follow our site know that there has been plenty of new information, updates and changes come out of our site over the last few months, but we have not posted much about our solar cooking experiences as you can well see by the large gap in the date time lines.
We have solar cooked a few times in the last three months but due to many activities and an abnormally wet, cold and cloudy winter (highly unusual for us) we have not had as many opportunities to cook with our solar cookers.
The few times we did so were short, quick, simple items and I did not post anything on the site referring to it.
Today though, we had the first chance to use a new "Parabolic Solar Cooker" that I had received from a company I ordered from which is Located in Canada.
During all of our storminess it remained inside the box in my office until about three days ago when I asked my second youngest son if he would like to put it together.
The cooker came disassembled due to it's size and weight, but had good instructions for putting it together and was accomplished within about an hour.
(I will go into more detail elsewhere on the site about the Parabolic and how it is different than the box and panel cookers that are more prevalent)
To make a long story short, we finally were able to get our long awaited sunshine, and while we were out playing some basketball as a family I quickly cooked up a small pot of oatmeal on the parabolic cooker in about four minutes.
The water (1.5 cups) came to a boil in about a minute and a half when I then added the oatmeal and brown sugar and continued to stir the concoction so that it would not stick to the sides since a parabolic usually reaches higher temperatures in shorter times compared to other types of solar cookers.
It was a nice hot breakfast on a cool, crisp morning.
Saturday March 7, 2009
St. George, Utah
Elevation 2800 ft. above sea level
High Temperature 60° F
Well, we finally got to use the parabolic solar cooker again...after many more days of cloudiness (highly unusual this year)
We decided to do a quick lunch with the parabolic by cooking (actually heating) some chili, some pork and beans with wieners and the rest of the hot dogs we just grilled up in a frying pan.
The chili I cooked using a stainless steel cooking pot, making sure that it was deep enough so as not to have bubbling chili splattering on the parabolic solar panels.
I then took a frying pan and put some frozen hot dogs where they almost immediately commenced to sizzle since the pan was already very hot.They soon were thawed and cooking quite nicely.
Due to the high temperatures produced by the parabolic I continually stirred or turned the hot dogs so as to not burn them.They were finished cooking in about seven to nine minutes total from start to finish.
We then cut up three of them and put them into a pot with the pork and beans and proceeded to cook the pork and beans.
After each item was cooked I place each pan back on the parabolic in order to heat them up a little bit more before we took them in to eat.I had to do so because we could only cook with one pan at a time on the cooker, therefore the others would cool down a bit while one dish was cooking.
If I had been thinking I would have had my solar ovens out and had them functioning as warmers, wherein I could have placed all of the cooked dishes while waiting to finish the others.
As some already know, I mentioned that I like to have and to use more than one solar cooker in order to increase my capacity, and decrease my times for cooking.
Overall, with just the parabolic, it took about a total of twenty to thirty minutes to cook up the three separate pans of food.
As the family was finishing lunch I took our stove top aluminum popcorn popper and popped up a batch of popcorn on the parabolic cooker.This took about four to five minutes.
The popper has a handle to mix or spin the ingredients, nevertheless a few kernels burned due to the intense heat on the bottom of the popper, and the bottom outside got scorched a bit also.
As we mention on our site pages, one has to use a little more care when cooking on a parabolic solar cooker, but it is great to be able to "cover" those frying and grilling needs one may have... even when only using the power of the sun.
To See some of our photos of this recent cook out please visit our Solar Cooking Photos page
Saturday March 14th, 2009
St. George, Utah
Elevation 2800 ft. above sea level
High Temperature 70° F
Today was a busy day, having to spring clean the garage, amongst a number of other things to do.So we decided to Solar Cook our afternoon meal while we were cleaning.
I decided to do a big batch of Taco Soup since this is an easy dish and also a substantial and filling meal.
The recipe calls for browned ground beef which I cooked on our parabolic cooker using a stainless steel, medium sized frying pan.The ground meat can also be cooked in any kind of solar oven or cooker, which I have done often in my Hot Pot cooker.The only difference is that it will take a little longer to brown in the oven or panel cooker.
When the ground beef was browned I went inside to combine and mix up the rest of the ingredients.We like this recipe because it is so very easy to make.
After mixing all of the ingredients together in a large bowl I then divided it evenly between two Hot Pot Solar Cookers so that it would cook more quickly than if I were to fill just one cooker with an excessive amount.
At 11:00 AM I placed the reflector panels for each one of the pots towards the sun and set the pots to cook while we cleaned the garage.
I adjusted the Hot Pots about three times towards the sun during the whole cooking process, allowing the Taco Soup to slow cook until about 4:00 PM.
I stirred each pot of ingredients just one time, though it is not necessary to do so if one is not on hand.
The Taco Soup reached a slow rolling boil after about two hours and remained there until we sat down to eat.The remaining soup that was not served right away was left inside the pots and reflectors to keep it hot.
We set up our chairs and tables on the driveway, invited a couple of neighbors, and enjoyed a hearty dinner out in the warm spring time sun.
All of this was accomplished with no more effort than when we cook on the electric stove.
Sunday March 29th, 2009
St. George, Utah
Elevation 2800 ft. above sea level
High Temperature 61° F
Today before going to church we decided to put together a favorite casserole dish of Au gratin Potatoes.
The Potatoes had already been precooked, as the recipe calls for, in the Tulsi solar oven the day before.
All we had to do was to shred the potatoes and then mix in the rest of the ingredients and place them in a glass casserole dish.
At about 12:00 PM I set our Tulsi solar oven out on our round table in order to pre heat the oven somewhat.
I was not too worried about preheating though because I knew that the food would be cooking for about four hours.
At 12:30 I placed the potatoes inside of a 200 F oven and then adjusted the cooker to a midway point because we were going to be gone for about three and a half hours.This way the sun would hit straight on at about 2:00 PM and would heat with even more intensity, and then as the sun moved further along it would still receive enough rays to maintain a good steady high temperature until we arrived home again at about 4:15 PM.
The casserole was piping hot when I next checked on it, the oven sat at about 265 F, and to my chagrin, some of the food had boiled over the edge and onto the bottom of the oven.
We obviously overfilled the casserole dish.
By this time the wind had really picked up, but because of the weight and structure of the Tulsi, it did not affect the reflector panels and the insulation of the oven maintained the temperatures right where they needed to be.
I took the oven with the Au gratin Potatoes into the house and left it inside to keep it hot until we were ready to eat a half hour later.
Again I burned my tongue because the food always looks deceptively "not hot".
A Successful meal without much work or worry.
Monday-Tuesday March 30th and 31st, 2009
St. George, Utah
Elevation 2800 ft. above sea level
High Temperature 63° F
Monday when I arrived home around 11:30, It was a clear day and I decided that I wanted to warm up a leftover hamburger patty for lunch as well as the bun that it would go on.I pulled our Parabolic cooker a couple of feet from the garage out onto the driveway and placed the covered frying pan with meat and the two halves of the bun face down onto the cooker and focused it properly.
It took a total of about three, maybe four minutes, to heat up the patty and to perfectly toast the buns in the frying pan.
I then added fresh salsa, blue cheese dressing and a dab of barbecue sauce and some lettuce to make a great tasting burger.
I then set out my Tulsi Oven to preheat and took the covered, darkened stainless steel pots that came with it into the house. I proceeded to fill all four with various leftovers from the past three days that we wanted to finish off for our dinner this evening.
At about 2:00 PM I placed all of the pots inside a 350 F oven and readjusted it to the sun and then let it go until my wife arrived home at about 4:30 PM
There were some intermittent high clouds that came through, but the oven maintained a temperature of 250 F until we were ready to eat.
Every thing we ate today was re heated using no electricity at all.
Tuesday
Today's meal is going to be Tacos, so all I really needed to cook is the meat filling, and I did this in the Sport oven inside of one of the black pots.
I set the Sport out to preheat at about 10:00 AM while I worked on the computer.At about 11:00 AM I took two pounds of almost thawed ground meat and placed it into the pan and left it in the oven for about half an hour while I prepared my Onion, Garlic and Green Pepper mix in the food chopper.
After half an hour I brought in the meat in order to break it up and stir it around; having thawed completely by then, and starting to brown ever so slightly.
I then placed it back in the 300 F oven and set my timer for another thirty minutes and went back to work.
When the timer sounded I added the onions, peppers, garlic and other seasonings of oregano,basil, paprika, salt and pepper to taste, and mixing it in well; I returned it to the oven where I let it steep and stew for another hour.
By this time clouds had come in from nowhere and had caused the temperature in the oven to drop to about 225 F.
I left it for another half hour, cooking at 200 F., and then brought it into the house where I let it cool down a bit before refrigerating it until dinner time.
I had just enough time today to cook our taco filling before I had to shut it down.
Great tacos with excellent fresh salsa.
Sunday April 5, 2009
St. George, Utah
Elevation 2800 ft. above sea level
High Temperature 68° F
The sun was out and bright all day long, which allowed us to cook a complete meal.We thought that spaghetti sounded great since we had not had it for some time.
The first thing we needed to do was to set out the ovens to preheat; this we did at about 10:00 AM The Sport would be used for the spaghetti sauce, and then later on, the pie, and the two Hot Pots would be used for cooking the pasta.
I filled both Hot Pots about a third full of water and a tsp of salt in each pot, and set them out with the reflector panels in order to get them up to boiling point. I set them out at about 12:00 PM with the idea that we would be eating at about 4:30 PM after church.
In this way the water would be boiling and ready for the pasta at about 4:00 PM.
I put a pound of mostly frozen ground meat into the black granite ware pot and into the Sport, and set the timer for about thirty minutes.
When the timer rang I retrieved the pot and proceeded to break up the ground meat which was now thawed and had started to cook. The oven temperature showed about 215 F.
I returned the meat back to the oven and left it for another thirty minutes whereupon it was fully cooked and browned.
I dumped any excess grease and then proceeded to add the other ingredients to make up a homemade spaghetti sauce.
I used canned tomatoes, pureed lightly in the blender and added finely chopped onion and garlic as well as dry basil, oregano, parsley salt and black pepper.
After mixing all of these ingredients with the meat I returned the covered black pot to the Sport oven with reflector panels and directed it towards the sun and then let the sauce simmer until about 2:00 PM
I then took the sauce out and placed a Marie Calendar's Razzle Berry Pie into the Sport and covered and directed it towards the sun.
(We just happened to have one of these pies in the freezer and decided to use it.)
I let the pie cook for about one hour and forty five minutes at almost 300 degrees, using my timer to remind me to center the solar oven every 30 minutes to maximize the temperatures.
The pie was very cooked, but the crust was not very brown due to the heavy moisture content of the pie.
I will say that; with this pie I did cheat slightly by putting it into our electric oven for 3 minutes on broil in order to brown the top crust so that it did not look uncooked, even though it was fully cooked.I then returned the spaghetti sauce back to the Sport oven and left it simmering until we were ready to eat.
At about 3:45 PM I took my spaghetti (already broken in half)out to the Hot Pots where the water had been boiling for more than an hour and I divided the pasta between the two pots and quickly re-covered them and adjusted the cookers again towards the sun.
I used two Hot Pots because I did not want to fill one so full that it would overflow with too much water and pasta, and also so that each pot with the smaller amounts would cook much faster.
I left the past in for about half an hour and by 4:15 PM we were ready to eat.
The pasta was slightly softer than we like but it was not too mushy.Next time we will let it cook for about twenty minutes.The spaghetti sauce was perfect and very flavorful.
The rest of the meal was completed with a salad bread sticks and a drink.
All in all it turned out very well for a casual Sunday dinner.
Monday April 6, 2009
St. George, Utah
Elevation 2800 ft. above sea level
High Temperature 69° F
Today my solar cooking was done with Paul Munsen, President of Sun Ovens International, while we did our Television interview at the park in downtown St. George.
Since he had the Villager Sun Oven up for demonstration purposes, we cooked more chocolate chip cookies for the reporter and while doing the interview we had a loaf of french bread dough and some cinnamon rolls cooking in a couple of the Global Sun Ovens.
We got distracted with the interview and the cookies got a bit "browned" but they were still very tasty.
The sweet rolls and the bread turned out great and so we sent the bread, most of the cookies and some sweet rolls with the reporter back to her office.
Afterward Paul had to leave to make his way to Salt Lake City.
Tuesday April 7, 2009
St. George, Utah
Elevation 2800 ft. above sea level
High Temperature 78° F
Today I arrived at the house later than expected and was not sure what to cook.But, seeing all of that sunshine, I could not let it go to waste.
I looked into the freezer and spoted a whole, frozen chicken, and despite the late hour of 11:30 I washed it on the surface and coated it with a poultry seasoning salt along with some garlic and onion powder.
(See our Apple Brined Chicken recipe)
I did not expect the seasonings to penetrate the surface of the chicken very well due to its frozen status, but I lay the chicken into the black granite ware pot and set it into the SOS Sport Solar Oven that I had set out to preheat only ten minutes earlier.The oven had heated up to almost 200 F by the time I put the frozen chicken in.
I directed the oven towards the sun and I also added a little bit of a booster to the reflector panels by clipping on a car windshield reflector to the Sport reflector panels.This increased the size of the reflectors enabling them to capture and direct/concentrate more of the suns rays onto the oven and the pot; giving a boost of about 10-15 degrees more over the duration of the cook time.
I then set my timer every half an hour in order to maximize the temperatures by aligning the oven more frequently than normal.I did this because the chicken started out frozen and my time was a bit less than desired.
I left the chicken to cook until almost 5:00 PM and all of the time it was in the sun the oven maintained an average temperature of about 280 F, Until the last hour where it sat at about 310 F.
When we were ready to eat I quickly boiled some water on the parabolic cooker to use in our "quick" mashed potatoes (dehydrated).We accompanied all of this with a fresh green salad and leftover pie from Sunday.
The smell form the chicken was able to be detected long before we opened the solar oven and the cooking pot and when the kids uncovered it we found a very browned chicken, covered about halfway in its own natural juices.
Again the meat just fell off of the bones and we had to fish most of the meat out of the pan with a fork or spoon.The kids contended for the "crispy" skin while I just took a wing and some of the breast and thigh meat.The breast meat was very tender and the flavor was just right.
Total time from frozen to roasted was about five and a half hours.
No need to thaw when you can let the sun do that for you while cooking it at ideal temperatures.
Saturday April 18, 2009
St. George, Utah
Elevation 2800 ft. above sea level
High Temperature 84° F
Today was the last day of our solar cooking class.The day could not have been nicer...perfect for solar cooking.
Our menu for the class would include, Refried Beans Deluxe with chips and homemade salsa, Corn Bread,Grilled (sauteed)Onions, Peanut Butter Cookies and Hard Boiled Eggs.
I arrived at the usual time of the morning to get things set up at the park and my family arrived shortly after to help again with the class as they have done so for the past five weeks.
At about 10:00 AM I had all of the solar cookers out and preheating, when one of the class members, Georgia Gilmore, arrived early and asked if she might help prepare the food.
We happily obliged by setting her to the task of mixing up the corn bread batter.
In the meantime my wife and children were setting up all of the mini-solar panel cookers that we had made for each class member (all thirty one of them) and putting one egg into each black canning jar and then placing them inside of the oven cooking bag and standing them inside of the solar panel reflectors.
We used the egg in each jar to demonstrate to the class how a simple solar cooker can be made with very little effort and for very little money, and how effective one of these cookers can be.
After the eggs and solar panel cookers were set up, my wife and children started slicing onions and Georgia and I put the cornbread batter into the blackened stainless steel pans and put them into the Tulsi solar oven and then we started mixing up the ingredients for the Refried Beans Deluxe.
By about 11:15 AM we had everything cooking, when a couple from the class arrived with their Global Sun Oven (GSO) and had a brownie mixture that they wanted to cook and share with the class.We helped them set the GSO up and to clean it out,since this was their first time using it.
We let the oven preheat and then put the brownie mix in and set one of the timers.
We started class just shortly after 12:00 PM, along with a few outside observers who couldn't help but notice so many solar cookers spread all over the place.
After the corn bread had been in the oven for about an hour and twenty minutes (due to the amount of corn bread) we pulled the pans out and left them covered and stacked so that they would remain warm until it was time to eat.
My daughter then proceeded to put peanut butter cookie dough on dark cookie sheets and then to bake them, one sheet at a time, in the Tulsi, since it is the oven with the widest interior.My daughter always offers to do the cookies since that is her favorite thing to solar cook.
After about an hour and a half of cook time, right in the middle of class, we invited each class member to go and pick one of the home made solar panel cookers to keep for themselves and to find their surprise inside.
(This was to have originally been done in the previous week's class for Easter, but the rain caused the cancellation of the class.)
Each person was able to eat their own hard boiled egg while listening to the remainder of the class instruction.
We kept the class a bit shorter this time so that all could mingle, ask questions, and most especially...to eat.
We allowed each to serve themselves buffet style...Re fried Beans Deluxe with Fresh Salsa, Sour Cream and Chips along with Grilled Onions, Corn Bread, Peanut Butter Cookies and... an egg.
The class went very well and all had plenty to eat and were very happy to have been able to learn so much more about solar cooking techniques for their own use and benefit.
Monday April 27th, 2009
St. George, Utah
Elevation 2800 ft. above sea level
High Temperature 75° F
Today started out calm and clear but ended up very windy and hazy with lots of high thin clouds, nevertheless we were able to get our cooking in, with time to spare, before the clouds thickened up too much.
I decided to make up a pork chop stew of sorts, putting pork chops in a medium size roaster pan along with all of the ingredients for a stew.It was a cross between the traditional pot roast, using pork chops instead, and adding cubed potatoes, cut carrots, green beans, sliced onions and then adding a dry stew package mixture for the seasonings and an extra packet of dry mix of pork gravy.
Sometimes I just like to throw things together to see how they will turn out...and this stew turned out great, despite the concern brought about by the high clouds most of the later afternoon.
I set my pork chop stew out to cook in the Global Sun Oven at about 11:30 AM and let it go until 4:30 to 5:00 PM, adjusting the oven every so often and worrying that the strong, intermittent micro bursts of wind, might tip the oven during the last two hours of cooking.
The GSO stayed at between 300-350 F.
At about 12:30 I set a pan of salt water (2 cups) into the sport solar oven, in order to preheat the water for a medium size Lobster that my brother had given us.
I knew that it would not require a whole lot of time to properly cook the lobster, so I put the Lobster in at about 3:00 PM, which would give it about an hour and a half. (probably still more than enough time)
The sport maintained a temperature of between 250-300 F. due mainly to the high, thin clouds.
By 4:30 Everything was cooked and the house soon smelled of seafood when we uncovered the lobster.
The only thing that did not turn out well with the lobster was; that it was not large enough to give each person much to savor.
The stew cooked up great and the pork chops were very tender, as well as the potatoes...just right.
Tomorrow I am going to bake Gingerbread Cookies...
Wednesday April 29th, 2009
St. George, Utah
Elevation 2800 ft. above sea level
High Temperature 79° F
Clear Skies in the Morning, but lots of high, thin clouds by afternoon,nevertheless I was able to cook several trays of Gingerbread Cookies.
I also cooked up ground meat with seasonings and refried beans deluxe for some home made Burritos.
I set both the Sport and the Global Sun Oven out to preheat when I arrived home at about 11:30 AM and set right away to fixing the ingredients for the Burritos.
I took two pounds of mostly frozen,ground meat and set them into the black enamel ware pot and then into the Sport; the temperature was already almost 200 F.
I then set the timer for a half an hour and then set to preparing the ingredients for the re-fried beans deluxe and, then placing it into the other black enamel pot and into the GSO.
After half an hour I pulled the ground meat from the Sport oven and broke and stirred it into smaller pieces and then added the spices and other ingredients.
I then switched places with the two pots, putting the meat into the Global Sun Oven and the beans into the Sport.
Since I was early with my preparations of the beans and meat I did not concern myself with frequent tracking of the sun, therefore I only turned the solar ovens once or twice.I did not need the temperatures to be constantly high, but rather moderate or somewhat low for long, slow crock type cooking.
At about 3:00 PM I took the beans from the Sport and let the oven continue to heat up while I went and rolled out some gingerbread cookies in the kitchen.
The gingerbread recipe had been made a few days earlier and had been stored in the refrigerator.
I set the cookies on dark anodized aluminum cookie sheets and when the solar oven temperature was at 300 F I put the cookies in for about 10 minutes and repeated the procedure until I had baked three trays of cookies.They turned out soft and flavorful, except the one tray that was left in about five minutes longer.These were flavorful but a bit more crisp, like a ginger snap.
After the gingerbread cookies were cooled we put icing on them and had them for dessert after supper.
Thursday April 30th, 2009
St. George, Utah
Elevation 2800 ft. above sea level
High Temperature 80° F
As soon as I arrived home from my other business at about 10:00 AM I set to grinding wheat for some homemade wheat bread.
I have cooked wheat bread in the solar ovens many times, but today I was going to do three loaves all at once.
I quickly mixed up my favorite solar oven recipe for wheat bread dough, and within half an hour I had the bread rising near the window in my office since it is a bit warmer on that side of the house in the morning.
Of course both of the solar ovens were preheating and by the time the dough had risen, the Global Sun Oven was at 350 F and the Sport Solar Oven at about 300 F.
Since the GSO usually cooks a little hotter than the Sport I put two of the loaves in it and one loaf into the Sport.
I then set the timer for one hour.
When the timer rang I could see that both ovens were producing some nicely browned bread so I took the loaf from the Sport oven and cut some slices.The bread was nicely cooked; just as has been the result whenever I have baked bread in the Sport oven before.
The two loaves of bread in the Global Sun Oven needed about fifteen minutes more since, of course, it had more mass that needed to be heated.
All of the loaves were very soft and moist as well as flavorful.
The bread goes great with butter and honey.
Wednesday May 13th, 2009
St. George, Utah
Elevation 2800 ft. above sea level
High Temperature 88° F
We have been solar cooking all week long, almost every day, but because of work, commitments and solar cooking demos in my hometown four hours away to the north, we have been very busy this last week.
I have not had a moment to share all of our solar cooking efforts of the last couple of weeks so I am going to start again today.
I decided to do a casserole for dinner; Shepard's Casserole, as they call it here in Utah.
It is comprised mainly of potatoes and a meat and sauce mixture; and it has been a staple in my family for many years.
This dish is comprised of several steps, but with the cookers I have available it took no longer than it would had I been doing it the traditional electric stove/oven method.
I put the ground meat out to cook at about 12:30 PM.I put it into the Global Sun Oven without preheating it much because the meat was frozen and I was mainly intent on thawing and breaking it up.I set the timer for about a half an hour and checked back on it finding it much more thawed and easier to break into smaller pieces and adding salt to it.
I then returned it to the GSO and re focused it towards the sun, setting the timer for another half an hour.
After the meat was cooked, I let it drain and cool while I went about my other tasks.
About 2:30 PM I, and my third oldest son, set to peeling potatoes while a pot of water was preheating on our parabolic solar cooker just outside of the garage on the driveway.We added the potatoes after the water was boiling, which took only ten minutes to reach boiling stage.
The potatoes again reached boiling point in about five more minutes and remained at a steady boil for the duration of the cook time, while we adjusted the parabolic slightly only a couple of times during the process.
The potatoes took about 20 minutes, more or less, wherein I took them inside to be mashed.
While the potatoes were cooking I prepared the rest of the ingredients, mixing; green beans, pureed whole tomatoes, cooked ground meat, chopped dried onions and salt and pepper and topping it with the mashed potatoes and grated cheddar cheese on top.
I had enough ingredients that I had to divide it between a medium sized casserole dish and a large bread pan.
At 3:30 PM The casserole dish went into the Sport Solar Oven since it is able to accept wider dishes and the bread/cake pan went into the GSO.
I had not had much time to preheat the Ovens, but the GSO was at almost 300 F. when I put the casserole in and the Sport, which is a bit slower, was at just under 250 F.
The sun oven did not take long to rise back up in temperature, but the Sport seemed to struggle a bit more, mainly due to the size of the casserole which was much larger.
By the time we sat down to eat at 4:30 PM both dishes were piping hot, even the one in the Sport, which looked deceptively "not hot".I proceeded to burn my mouth on the casserole cooked in the sport.
With a combination of solar cookers at my disposal; it seems that the difference in time used and effort expended, when comparing between the traditional and the solar cooked methods, is very negligible.
But just as rewarding is the fact that we did not have to use one penny of electricity nor even heat up the house with the hot electric stove.
Wednesday May 14th- 29th, 2009
St. George, Utah
Elevation 2800 ft. above sea level
High Temperature 88°+ F
It seems that I let more and more time pass between postings here on this (b)log.
It's not that I am not doing any solar cooking, in fact I am cooking almost every day.
The main reason is that with two businesses, a family, and being the one who does most of the cooking; I usually don't have a lot of time to write about my solar cooking experiences and efforts, therefore I will do a condensed version of the last few weeks of solar cooking dishes and experiments.
In our house we use the solar cookers for making meals and also for reheating leftovers, in fact it is the preferred method over microwaving the leftovers.
There will be no particular chronological order to the dishes and foods that I will list but rather just a noting of the kinds and varieties we have cooked.
We cooked white and wheat bread; two to four loaves each time, using both the Sport and the Sun Oven.
We also baked a peach pie using fresh frozen peaches and a frozen crust that we precooked in the solar oven before adding the fruit and finishing the cooking process.This was accomplished in the Global Sun Oven.
We cooked chicken in the GSO as well as baked potatoes and also some hard boiled eggs.
A couple of times I cooked up a couple of pots of my No Meat Chili using both of my Hot Pots and had the chili boiling the whole five hours of cook time.
...I even took some time to do some solar cooked s'mores
 |
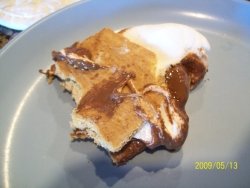 |
We always use our parabolic cooker in the mornings to cook up oatmeal, cracked wheat, sausages and eggs.
We also like to use the parabolic for frying some foods when necessary as well as boiling water to cook potatoes and pastas.
We also use our Hot Pots to boil pasta and potatoes as well, it just has to be done a bit differently and allowing a bit more time.
During these couple of weeks we also baked a couple of cakes, one white and one yellow, to eat with whipped cream and thawed fresh frozen peaches.
On the 16th of May I had a large solar cooking demonstration for a church group of about twenty five people where we solar cooked refried beans, grilled onions, baked cinnamon apples, four whole marinated chickens and chocolate chip cookies, as well as popcorn on the parabolic cooker.
And at another demonstration on the 28th of May; we cooked six Mango Cheesecakes, corn on the cob, blueberry bread, white yeast bread and a pork, onion, apple and cinnamon mixture for a group of people at a Rehabilitation Center.
Besides all of this we used our solar cookers for heating up lots of leftovers,cooking dry wheat and beans and for boiling water for other purposes and uses.
The ability to solar cook a large amount of our overall meals really is not that hard to do.It does take a little bit of thinking ahead and some adjusting to schedules at times, but it is easily accomplished when one wants to do so.
I will try and keep up with my posts in a more timely manner so that others can benefit therefrom.
* * If others would like to share their own solar cooking experiences, we invite you to do so here on this page.
Wednesday June 17th-Thursday June 18th, 2009
St. George, Utah
Elevation 2800 ft. above sea level
High Temperature 88°+ F
On Wednesday we used our parabolic cooker to brown some ground beef for some "Hamburger Gravy" that we wanted to cook ahead of time in order to serve it over mashed potatoes.
The browning of the ground meat took a total of about 15 minutes in a covered frying pan on the parabolic.The ground meat was frozen, so I did not want to burn the meat with too high of a temperature, so I set the focal point of the parabolic off-centered; onto the edge of the frying pan and the meat thawed and cooked at a lower temperature and did not burn.
We then drained the grease and my wife proceeded to mix the other ingredients into the ground meat and then put it all into one of the round black enamel roasters.
We then set the pot into the preheated Sport solar oven and oriented it to the sun.We let the gravy mixture cook for about three hours at about 265 F, which was high enough that the large amount of gravy we had in the pot boiled out a bit onto the floor of the solar oven.
Clouds came and went most of the day, but the time we were cooking the gravy was not too heavy with clouds, so we were able to finish the cooking with out any problems at about 4:00 PM; when the clouds thickened up even more and pretty much put an end to solar cooking.
In the end we did not have potatoes and gravy for dinner due to the fact that we did not finish some errands we had until late in the evening, and we decided to save it for the next day.
On Thursday morning, around about 10:00 AM we decided to put most all of our cookers to work today since it was one of the first totally cloud free days we have had in many weeks. (strange Spring weather)
We set out the GSO, the Sport, a Hot Pot to preheat; and the parabolic was readied for heating water for mint tea, and later for heating up some canned soups for our kid's and visiting friend's lunch.
We mixed up a batch of white bread dough, enough for four loaves, and set the dough to rise for about a half an hour in a warm room of the house.
We also prepared a pork roast with seasonings that we were going to cook in the Hot Pot.The roast will be used for the meat filling of our homemade"taquitos" that we will be making later in the week.
We like to pre cook many of our recipe ingredients ahead of time so that we can have them readily available, but most of all to take advantage of the available sun at the moment.
The solar ovens were both at 350 F when the bread was raised enough, so we put two loaves each into the GSO and the Sport.
The Sport always drops initially in temperature a little bit more than the sun oven, but soon regains the majority of the heat, although not quite as high as the GSO. But, both ovens take the same amount of time to cook two loaves of bread, about an hour and fifteen minutes, and both loaves were just right, slightly browned from the sport and a little darker in the GSO. The hot bread tasted very good with butter.
I put the roast in the Hot Pot with just a small amount of water for gravy purposes and then left it from about 10:30 AM to about 4:00 PM, turning it just a couple of times to orient it.A couple of clouds came and covered the sun for a few minutes, but the sky remained mostly clear and the roast cooked at a slow boil the whole time, and ended up very tender and browned by the time we finished the cooking process.
Today was a very productive solar cooking day.
Saturday June 20th, 2009
St. George, Utah
Elevation 2800 ft. above sea level
High Temperature 88°+ F
Today was the fourth day of class for this session and the day started out totally cloudy, after having a perfectly sunny day before.
We proceeded with all of our plans as usual, hoping that the day would eventually clear up like so many others do by early or late afternoon.But, today did not turn out so well.
We had on our menu a vegetable and fruit selection of corn on the cob, grilled (sauteed)onions, broccoli and cauliflower and baked cinnamon apples; since this class had never had these items from a solar cooker.
We had most of our foods prepared before arriving at he park at 10:00 AM, so all we had to do was set out the solar cookers to preheat; which did not work out very well with mostly cloudy skies.
We could see that the clouds would eventually move to the east, but we were not able to get much sun until almost 11:00 AM.
I had the Hot Pots pre heating with water for the corn on the cob and also the parabolic which I planned on using to get my water hotter, more quickly.
The onions were placed in the round, black roaster pots as well as the cinnamon apples and were then distributed between the two Sport ovens, the Sun Oven and another Hot Pot that arrived a bit later.
The majority of the broccoli and cauliflower was cooked in the Tulsi using it's blackened, stainless steel covered pots.
Not only were we contending with the clouds, but also some very stiff winds that almost blew my Global Sun Oven Over and a very strong micro burst wind that did pick up my parabolic cooker and dumped the pot of corn onto the ground.That is the first time I have ever had that happen with the parabolic.
The sun came out for a while and some of the foods finished cooking and some reached about the three-quarters point by the time the class was ending and the wind and clouds increased even more.
Everyone decided to eat whatever was finished and even partially finished.Several pots of corn on the cob were quite well cooked; and a couple were about three quarters finished.The same was the case for some of the apples and onions.
Some of the participants thought the food was good enough, even though some onions and apples were slightly "crisp" in texture for not having cooked quite long enough.
All of the broccoli and cauliflower from the Tulsi and the GSO were completely cooked though.
Everyone felt that the class was a good learning experience due to the fact that each could see how it is possible to solar cook and achieve reasonable results under less than favorable conditions.
Monday June 22, 2009
St. George, Utah
Elevation 2800 ft. above sea level
High Temperature 95°+ F
Today was a perfectly sunny day, not a cloud in the sky.
We did not have much planned for solar cooking today other than the taquitos that we have been wanting to do since last Thursday.
As we mentioned earlier we had already cooked the pork roast in the Hot Pot and refrigerated it until we were ready to use it.When I arrived home at 11:00 AM I immediately set the GSO out to pre heat and retrieved the roast from the refrigerator.
I put the roast into one of the black roasting pans and set it into the GSO and left it while I went to work on the computer.
At about 12:10 PM I went and retrieved the pork roast from a 350 F Sun Oven and carried it into the house where I proceeded to mix shred the very tender pork and to add the remaining ingredients needed to make the filling for our taquitos.
We used a recipe similar to the one we use for chimichanga filling.
In the meantime I put a deep, stainless steel cooking pot onto the parabolic in order to heat the oil for frying our taquitos.
I continued putting the taquitos together and then took a tray of them out to the parabolic where I could smell the heated oil from quite a distance.
I put one of the taquitos in and in proceeded to brown very quickly because the oil was too hot. I had another taquito stuck to the tongs at the time and thus I was not able to pull the first one from the oil quickly enough before it was a very dark and crispy brown color.
I pulled the pan from the parabolic to let it cool for about fifteen seconds before I put some more taquitos into the oil.
By that time the soft corn tortillas had begun to dry and split with the warm dry air and when I put them into the oil they pretty much came apart.
The second batch of tauitos also did not cook quickly enough and were softer than usual because I had let my oil temperature drop a little.
I let the oil heat for about a minute longer before proceeding with the other taquitos and these turned out better, although split and falling apart due to the drying of the tortilla.
I remedied this by making up four taquitos at a time and cooking them right away each time, thus avoiding the drying and splitting.
Overall it took only about twenty minutes to fry all twenty four of the taquitos, and very little oil splattered out of the pan onto the parabolic because of the deepness of the pot.
We kept food hot by placing the cooked taquitos into one of the black roasting pans with a lid on them, sitting in the sun.
While I was cooking my wife and son prepared the fresh salsa and guacamole that would be used as condiments, along with sour cream, for the taquitos.
We love Mexican Food, and especially solar cooked Mexican Food.
Sunday 28 June 2009
Today before going off to church we decided to solar cook another marinated chicken, some broccoli and cauliflower, and mashed potatoes on the parabolic cooker.
We were also able in the morning to solar cook three loaves of wheat bread; one in the Sport and two in the Sun Oven.
The bread for some reason though did not rise as well as it normally does, and we were not quite sure what it was that we did wrong, nevertheless it was still a moist and tasty wheat bread.The broccoli and cauliflower we cooked up in about an hour starting at about 10:30 AM, and we did it in the GSO.
We placed the marinated chicken into the pre heated Sport Oven at about 12:00 PM and I adjusted it so that it could receive the sun's rays throughout the next four hours, with the most direct intensity at about 3:00 PM.
When we arrived home from church at 4:15 PM the Sport showed a temperature sitting at about 275 F. and one could smell a very succulent solar cooked chicken.
As soon as we arrived home I pulled the parabolic out and set the pot of potatoes and water onto it and let it go, adjusting the focus level every ten to fifteen minutes.
Because of the amount of water and potatoes, it took about forty minutes to finish boiling the potatoes from a cold water start to a boiling hot finish.
I think next time I will have a Hot Pot set out with water pre boiling so that I don't have to use so much time getting it up to boiling level.I have noticed it takes time to heat up even on a conventional stove top when one has such a large amount of liquid and food.
We mashed up the potatoes and then retrieved the chicken from the Sport where we found it to be nicely browned on top and tender inside…falling of the bone tender.
I don't think we have had a bad solar cooked chicken yet.
Tuesday June 30th 2009
Today I decided to actually make Jackie Harsha's Blueberry Quick Bread.
I had the premixed dry ingredients stored in a bowl since Saturday's solar cooking class and wanted to use it before the refrigerated blueberries decided to turn bad on me.
The blueberry quick bread recipe from Jackie's book Heaven Sent Food it probably one of the easiest to make of its kind.The ingredients are very basic and it took all of maybe five minutes to mix it up and pour the dough into an oiled black enamel roasting pot and placing it into a 350 F Sun Oven.
I set the timer for an hour, but checked on the bread every twenty minutes just to observe its progress.When the timer rang we (and the sun) had produced a light golden brown bread with blueberry dots throughout, and boy did it smell good.
We let it cool about ten minutes and then using a knife around the edges, released it upside down from the cooking pan onto a plate, where we proceeded to cut a small piece to sample some warm blueberry quick bread.
We cooked one other food item on the parabolic before the late afternoon clouds moved into the area, and that was some link sausages that we wanted to use for some egg-onion-bell pepper breakfast style burritos.
We try to use every available opportunity that we can to solar cook our food, even if it is just bits and pieces of a recipe.Most days we are able to do so even when the clouds make their presence felt off and on throughout the day.
Wednesday, July 01 2009
When I got home from my morning business at 11:00 AM I quickly set out the Sport and GSO to preheat because I wanted to do the last batch ofBlueberry Quick Bread and also to bake up some biscuits.
We were going to have biscuits and sausage gravy for lunch, and I wanted to take half of the quick bread to a neighbor since we had already had enough from the previous day's cooking efforts.
I set out the parabolic with a frying pan of original flavor link sausages cut up into small pieces and left them for a couple of minutes to start them frying. (covered with a lid of course)I then proceeded to put together the blueberry quick bread a little at a time while I kept an eye on the sausages so that they would not burn.That is one of the things that make a parabolic a bit more "hands on", because the heat is much more intense; it necessitates more frequent attention than a solar oven or panel cooker.
As soon as the sausage was cooked, I removed the sausage and measured the remaining grease and added some butter to make up the remaining requisite amount and proceeded to make a homemade sausage country gravy, browning the flour mixture and adding milk to finish it off on the parabolic, wherein I added the sausage back in to the gravy and then let it cook for a little while more.
I then finished up the blueberry quick bread mix in order to get it into the pre heating GSO.
Somehow I added too much liquid and sugar and the mixture ended up looking more like a cake batter.I decided against adding more flour in order not to upset the ingredient balance any more than I already had and I put it into the oiled roaster pan and placed it into the 375 F GSO.
The quick bread took about the same time to cook as the one the day previous except this time I could not see any blueberries throughout the bread and when we retrieved the bread from the oven we found that all of them had sunk to the bottom and we ended up having "blueberry upside down cake".The cake tasted the same as the bread; it only looked different.
I mixed up a quick batch of Bisquick Biscuits and put ten of them on a small dark cookie sheet and then placed them into the preheated Sport Oven.
I set the timer for fifteen minutes and when I checked on them they looked like they needed about ten more minutes.
The biscuits did not brown very much as do some of our breads, and I guess they may have done so if I had left them in a bit longer, but I did not want to dry them out.The biscuits were cooked just fine though and tasted great with the sausage gravy.
We had fresh fruit and tomatoes along with our biscuits and gravy for lunch.
Thursday, July 9th to Saturday July 11th 2009
I thought I would share a bit of our solar cooking that we were able to do while up in the mountains of Southern Utah while on a family camping trip.
Of course when one goes camping one always seems to overdo it with gear, food and supplies, but we were not about to leave our solar cookers behind due to an overstuffed vehicle...we found a way to get them in.
We took our Sun Oven and our Sport Oven as well as the Parabolicmounted on top of the van; the way I normally carry it with us.
We arrived at our camp spot at a place called Navajo Lake, a very beautiful mountain lake situated at just over 9,000 ft. in the Dixie National Forest, about 20 miles above Cedar City, Utah.
We arrived at about 2:00 PM and quickl set out our cookers to pre heat while we set up the rest of the camp.
We had planned for some simple, easy to fix foods for our first day so as not to over work ourselves with all of the many demands of getting ready for and setting up a campsite.
We decided to have two different kinds of soup, (from the can) and some really tasty, dehydrated hasbrowns (rehydrated of course)as well as somefresh fruit and a solar cooked birhtday cake (cooked earlier in the day) for our third oldest son's birthday party.
We put the soups into the Sun Oven and the Sport and we did the hashbrowns on the parabolic cooker.
As soon as the soups were ready, I put the solar ovens and the parabolic to work heating pans of water for cleaning and washing after the meal and later on.
The whole time we were up there we had the solar cookers constantly heating up water in between meals.This conserved much gas and other fuels and was very effort free, because we just let the cookers do their thing...heat water and foods with the ray's of the sun while we went about our other business.
Needless to say, the solar cookers garnered a lot of attention from nearby fellow campers and outdoor enthusiasts and I spent time on several occasions explaining the cookers and their benefits as well as inviting the people to visit our site in order to learn more about solar cooking.
Every one that inquired was very intrigued with the idea of learning how they might use a solar cooker for their cooking needs, and most especially while camping.
The second day at camp we let the Sport Oven cook our taco meat for our lunch time taco meal while we went out and explored.The rest of the day though ended up being a bit cloudy, but we placed pots of water to heat in each oven anyways and with the intermittent sunshine the water still heated up to a pretty nice hot temperature.
We used a gas stove to do the rest of our cooking, but felt very good about the fact that we used far less propane than would have been necessary had we not had our solar cookers.
Sunday, 12 July 2009
This morning we cooked up our usual fare of oatmeal and finely ground wheat (gruel) that we like to have for breakfast on a Sunday morning.
We cooked it up quickly using the parabolic solar cooker and served both pots steaming hot along with orange juice and toast.
As soon as the oatmeal and gruel were finished cooking I placed a frying pan of sausage on the parabolic to start it cooking while we ate our breakfast, checking on it every few minutes so it did not burn; because a parabolic is very hot.
The sausage was to be used in our homemade macaroni and cheese that we were going to have for dinner.
As soon as the sausage was finished (about 10 minutes) I placed a large pan of water on the parabolic to cook up some macaroni pasta.Because of the large amount of water it took about ten to fifteen minutes to get it boiling and then about another fifteen to boil the macaroni.I checked on the macaroni about every five minutes in order to adjust the parabolic for more efficient heating and to stir the pasta every so often.
Because we have only one parabolic, my wife did use the stove-top inside the house to fix the cheese sauce mixture, but that is the only use of the electric range in preparing the macaroni and cheese; this mainly due to a time constraint.
We mixed the ingredients together and placed all of it inside of our medium sized, black enamelware turkey roaster and placed it in the refrigerator until I was able to slip out of church for five minutes in between classes at 3:00 PM.I then placed the pot of macaroni into the Sport Solar Oven that I had left outside preheating and oriented it towards the sun.
I also placed eight ears of corn into the Hot Pot that I had set out at noon, in order to have boiling water ready for the corn.
When we returned from church at about 4:15 PM we set the table and then sat down to a ready cooked meal just twenty minutes after we arrived home.
Monday, 13 July 2009
Today when I arrived home my wife had a table set up with the Sport and the GSO; cooking trays of homemade oatmeal raisin cookies.This is actually a little unusual, because my wife has never done any solar cooking totally on her own from start to finish.
First of all; she works at one of the local schools during the school season, and I am usually the one at home to do the cooking.And, it took her a while, working with me in my solar cooking classes and other demos, to get more comfortable with cooking on her own.
Besides the cookies she also had prepared a beef stew in the Hot Pot and was just setting it out at about 11:30 AM in order to let it cook all day long.
This is the first time we had baked oatmeal raisin cookies and were not quite sure how long to let them cook, so we let them go about eighteen minutes.The cookies turned out fine, but we noted that they would be just right if we cooked them for only fifteen minutes.
Even two days later the cookies are just as tasty and as moist as they were on the first day.
The Hot Pot of stew; at times was boiling so rapidly; that I turned the cooker to an angle that was not so direct to the sun so that the stew would cook at a lower, slower simmer.
At 4:30 PM we brought the stew in for the evening meal and left it on the counter to cool a bit inside the Hot Pot so that it was just right at 5:00 PM, and not "mouth scalding" hot.
The potatoes and carrots were very tender and the flavor was excellent, so much so that our eleven year old son had two large bowls of the solar cooked beef stew.
August 2009
I'll have to apologizefor not keeping more up to date with our solar cooking experiences, it has been a very busy summer.I am trying to run two businesses, take care of family,personal, and church responsibilities as well as put on and carry out solar cooking demos/classes almost every weekend of the last month and a half, with five more yet to come before the summer is finished.I will say though that we have been able to solar cook at home almost every single day that we have had sun.And, our solar cooked fare ranges from simple one item dishes to all out full-scale meals, to just warming up the day before left-overs.
I guess when things slow down a bit more and I am not so "darned busy", I will be able to describe in more detail what we were able to cook, the steps used to do so and how the dish turned out.
(This is where it would be nice to have others share their own solar cooking exploits on our share/submission form at the bottom of this page)
I will mention briefly some of the major dishes that we have been able to solar cook over the last three weeks starting with a Ground beef and rice oven casserole which turned out very moist and flavorful, a big twelve (12) pound homemade four cheese lasagna
We also have cooked up mashed potatoes and gravy as well as baked potatoes and chicken and marinated roast beef and apple brined chicken thighs.
We baked a cake, chocolate chip and peanut butter cookies, white and wheat bread and fried up some more Chilean Fry bread on the "Solar Burner" parabolic cooker.
There is so much that one can cook on a daily basis using a solar cooker that it just doesn't seem natural to me any more to do it any other way now.Of course the weather can cause me to have to use the standard methods every once in a while, but until that time I just keep using the free energy of the sun.
Saturday August 29th 2009
St. George, Utah
Elevation 2800 ft. above sea level
High Temperature 106°F
Today we had another solar cooking demonstration for another church group.
There were about forty people in attendance for the mini-class and the meal.
With these demos we usually use the same tried and true foods and recipes that we have used for our solar cooking classes also, because they are tasty,simple, very substantial and filling and they show a broad variety of foods being cooked in the different kinds of solar cookers.
The day was mostly sunny, but did have some high very thin clouds, mixed with haze from the fires that were burning in the mountains north of St. George, which did not really affect the cooking process at all.
The foods we cooked for the event were four, very full, enameled roaster pans of chicken legs/thighs that had been marinated overnight.(lacked a little salt)These were all cooked in the three Sun Ovens with the exception of one round roaster that was placed in a Sport Oven.
We also had two Hot Pots and one round enamel roaster filled with baked beans that were allowed to cook from 11:00 AM until 4:00 PM, just the way we like them; slow and low (temp), bringing out the deep, rich flavor of the baked beans.
We also had four round enamel roasting pans filled with our always popular baked cinnamon apples which were also permitted to cook for the same amount of time as the beans.And then we had three Hot Pots of our seasoned, sauteed/grilled onions.
All of these foods were allowed to cook for about five hours, usually at about 300 F on average for all of the cookers, except the Hot Pots which were probably around 265 F+.
Sometimes I had to remind myself not to adjust the ovens quite so frequently so that the temperatures would not remain so high.It is not necessary to have a solar cooker over 300 F. while cooking for that long, it's better to have it cook similar to crock pot cooking.
Through out the day we also baked several batches of chocolate chip cookies in the Tulsi oven and popped up some popcorn on the parabolic as well as some sausages for my late breakfast.
By the time all were ready to eat at 4:00 PM, everything was more than ready, in fact the chicken was very browned on top due to the radiated heat of the roasting pan lids.Again, the bones of the chicken just pulled right out of the meat when lifting them from the pan.
Our baked cinnamon apples were especially good because we stirred in some dissolved corn starch and vanilla extract the last two hours of cook time to thicken them up, and when we opened the pots of apples after such a long cooking period, there was a sweet caramel smell from the vanilla and brown sugar which had become candied/glazed.
Everyone at the event very much enjoyed the food and the knowledge gained that day on the excellent benefits of solar cooking.
Sunday August 30th 2009
St. George, Utah
Elevation 2800 ft. above sea level
High Temperature 105°F
Again we had another hazy, smoky day due to the continuously burning fires, but we were not going to let that stop us from solar cooking, although it did have me a little doubtful in the early part of the day.
I set out the Sun Oven at 10:00 AM just to see if it was going to be affected by the conditions, but after about half an hour the temperature in the oven stood at almost 300 F.So, I told my wife to proceed with the Bundt Cake that we wanted to try for the first time in the Sun Oven.
I then proceeded to place the two Hot Pots out, one with four eggs and the other with about ten small to medium sized potatoes in order to cook them up for our potato salad we were going to have for dinner after we arrived home from church at 4:00 PM.
We were also going to cook up a big six pound "Cooks" brand ham shank in our Sun Oven after the Bundt Cake was finished.
We put the Bundt Cake mix into the 350 F. Sun Oven at about 11:00 AM and set the timer for an hour of cook time.
I checked on the cake after about forty five minutes and it showed signs of rising quite a bit, and when I checked fifteen minutes later, some of the cake had risen and flowed out of the pan and on to the floor of the oven.
We just left the cake to continue cooking and at an hour I reset the timer for another fifteen minutes because the top of the cake needed some more browning.
Twenty minutes later it looked like it was finished because the knife came out dry where I had inserted it. Only I found out later that such a moist, rich and thick cake needed to cook for about a total of an hour and forty five minutes...it was still somewhat wet and uncooked at the very bottom of the bundt pan.
But, I have always said that the best way to learn to really solar cook is to try anything and everything until it turns out right.
In the end, the cake turned out fine after cooking it a while longer, although this cake was a lot more "spongy" than the traditional bundt cake, due to the lower temps and longer cook times.It was still a very tasty cake despite the challenges encountered in getting it to it's edible stage.
Next time we will do things a little differently.
After the cake was finished we put the Ham into a medium sized oven bag and laid it into the bottom half of one of the Hot Pots and set it inside of the Sun Oven to cook for the next four hours until we returned home from church.We set the oven at the midway point of the sun's trajectory and left it that way, so that it would slow cook while we were gone.When I returned home the temperature was at about 275 F and we immediately sat down to a meal of tender and juicy ham accompanied by solar cooked potato salad and an amusing "spongy" bundt cake with icing.
Everything tasted great though, and all served themselves abundantly from the "solar cooked offerings" we had on our table that day.
Saturday, October 31 2009
St. George, Utah
Elevation 2800 ft. above sea level
High Temperature 73°F
(I've just decided to write about our solar cooking when I have time to do so, being so busy with work, family and the solar cooking business)
Beef stew had been on my mind for a while now, so I decided to do up a batch in the "elevation adjustable" Sun Oven, since at this time of the year the sun is lower on the horizon and the Hot Pots are not quite as effective or efficient for longer cooking items that need several hours.
I prepared all of the vegetables as well as the broth or soup mixture that we normally use in our beef stew recipe (found on our recipe page)and I set it out to cook at about twenty minutes before ten in the morning and then headed off to our son's basketball game.I did not put the beef into the mix since I had not had time to brown it before the rest of the stew ingredients were ready so I decided that I would do this when we returned home from the ballgame.Since I have the Solar Burner Parabolic, it took no time to brown up the cubes of beef roast, to which I mixed in flour,browning it with the beef also, and which then would be added to thicken the stew.
I combined the meat with the rest of the stew and then let it cook until about 3:30 PM whereupon we decided that we were going to have to put it into the refrigerator Until Sunday dinner, since we were heading out to our church Halloween social and would not be around to eat it today.
The next day before heading off to church, I set the Sun Oven out to preheat a bit and then placed the pot with the stew inside at 12:30 and angled the oven quite a bit since the sun is lower on the horizon and then set the oven at about the midway point since we would not be arriving home until just after 4:00 PM.When we did arrive home and checked on the oven, the temperature still stood at about 250 F, and you could smell the strong aroma of the stew.
All of the vegetables and the beef were cooked to perfection and had a very delicious taste.
* One other item that I cooked on Sunday was our pumpkin that had been on our front porch the night before.Since our daughter had carved it only a few days previous and since the night time temperatures were sufficiently cool, the pumpkin was in good condition still.
I used a knife to cut off the outer hard surface and then cut the pumpkin into several pieces and washed them with water and then filled two round roaster pots full.
I then stacked one pot on another and placed both of them into the Sun Oven and let them cook for about two hours, due to the large amount of pumpkin.
They cooked up fine and later on that evening we used the pumpkin to bake up some "Wheat Chocolate Chip Pumpkin Muffins" which are always a favorite in our household.
The rest of the pumpkin will be used for "Sopaipilla", Chilean Style.
I like it when I am able to use things, such as "jack-o-lanterns" for something useful rather than throwing them away at the end of Halloween. (We also cut up our Christmas trees and stack it for firewood...just in case we ever need it.)
November-December 2009
St. George, Utah
Elevation 2800 ft. above sea level
High Temperature 73°F-35°F
I have been very inconsistent again in keeping my ledger full of my solar cooking exploits, but I can happily say that I have done a lot of solar cooking throughout November and into December.
Whenever there has been sunshine, I have been using my solar cookers for cooking, reheating leftovers, boiling water, doing demonstrations for people and so forth.
Towards the end of November we were able to cook up taco meat and refried beans for our homemade "big burritos".We also cooked up someshepherd's casserole, browning the meat on the parabolic as well as boiling the potatoes on the same.
The combined ingredients were then placed together to cook in the Sport Solar Oven for our evening meal.
We have also baked bread several times over the last month as well as cooked some chicken, baked potatoes and an assortment of other vegetables.
And just this past Sunday, the 6th of December, I did a large roaster of potatoes, carrots, onions and a four pound pot roast in our Sun Oven.I set the roast out to start cooking at just before 10:30 AM and by 2:30 PM the meal was all cooked, but I had to take it into the house because of thick gathering clouds and leave it in the oven on warm to keep until we were finished with Church at 4:00 PM.The clouds did not allow me to let it keep warm in the Sun Oven for the remaining time until dinner.
The Pot roast and the potatoes turned out excellent, all of it very tender and flavorful.
Monday the 7th of Dec. was a very cloudy and rainy day, but today, Tuesday the 8th of Dec. is bright and sunny, albeit a bit cold.The only thing I did today was to cook some bacon in the Sport and to reheat the leftover pot roast and potatoes for lunch.It only took about forty-five minutes to heat the meat and potatoes to "piping hot"
When I am home earlier, I am able to always use the solar cookers for cooking or heating up my lunch while I am busy doing other things.
______________________________________________________________
Super Solar Cooking Week
June 4-8, 2013
St. George, Utah and Spanish Fork, Utah
A very, very busy solar cooking week...
We (I and my assistant, Joyce and my wife) have been very, very busy this week cooking up a solar storm.
We have had four solar cooking demonstrations with two more to come the next week.
On Tuesday, June 4th we were asked to solar cook a full meal for a gentleman (Jeff) and his family and invited guests.
We ended up feeding a total of about 18 people all together.
Jeff and Joyce came up with the menu and we put it all together and cooked it at his home with all of our solar cookers out on his driveway next to the road.
We had quite the array of solar cookers set up with Four Global Sun Ovens, and two All American Sun Ovens, one SOS Sport Solar Oven and Three Hot Pots, one Tulsi Hybrid Solar Oven and two Solar Burner Parabolic Cookers.
The menu was a quite ambitious fare which included two big pots of pot roast with all of the trimmings of potatoes, onions, carrots, squash, cream soups and seasonings.
We had to quickly fix the pot roasts since we were starting a little late in the day, but we were able to have them into the Sun Ovens at 1:00 PM and time to cook until 5:30 PM
After those were in the ovens, we commenced to prep and cook made from scratch whole wheat dinner rolls cooked in the Sun Ovens, candied carrots in the Tulsi, sliced onions and zucchini with seasonings in a Sun Oven, steamed broccoli and cauliflower in the Hot Pot, Butternut squash and seasonings in the SOS Sport Oven.
We also made German mini-pancakes (with fruit and jam topping) in the Sun Ovens and we made up a batch of scones that we deep fried on the parabolic cooker after which we used the same to pop a bowl of olive oil and salt popped corn.
Joyce decided to finish out our menu by baking up a tray of chocolate mint brownies at the very end and so we had some warm brownies to finish off the meal.
Our host, Jeff, who accompanied us throughout, was quite fascinated by all we were able to cook and with the array of solar cookers that we had at our disposal.
The dinner guests arrive towards the end of the cooking, but were still able to see some of the cookers at work with the last of the food that remained in the solar cookers.
At 5:30 we served up a delicious solar cooked meal
...The very next day (Wednesday) Joyce had another solar cooking demonstration/party that she catered for some people that were part of a mothers and children’s group and who wanted Joyce to solar cook for their group and so they cooked hotdogs, popcorn and deviled eggs and potatoes for potato salad, cupcakes, cookies, s’mores and a few other items.
Thursday the 6th of June, we were both scheduled to cook for a church ladies group here in St. George and we got set up and started cooking at about 12:00 PM so we would have everything ready for the evening get together and meal at 7:00 PM. This meant that we had to time all of our cooking and our menu so that we would end up with a hot meal at such a late hour. With the long summer days we are having this was not too difficult to accomplish.
We invited the ladies to come earlier, about 5:00 PM, in order to observe much of the solar cooking still going on and to be able to learn more.
Our menu for this demo/class was quite ambitious and varied.
We cooked spaghetti and meatball sauce, Cuban Black Beans and Rice, Broccoli and Cauliflower, sugared carrots, Pineapple Streusel cake, Chocolate Bundt cake with Chocolate mint icing, five loaves of bread and two dozen dinner rolls, mini German Pancakes with fruit topping and solar cooked plum jam and finally; popcorn.
The meal was a big hit and the class on solar cooking was very well received by the ladies, with lots of enthusiasm and interest in being able to do the same.
Two days later, on Saturday the 08th of June, we were four hours to the north at my Sister and her husband’s place in Spanish Fork, Utah (near Provo) to do another big solar cooking demo/class for her church group and neighborhood.
We started cooking at 9:00 AM and cooked lots of foods up until about 3:30 PM.
We had Four Sun Ovens, Three Hot Pots, A SOS Sport Oven, A tulsi Oven and two Solar Burner parabolic cookers to cook all that we had on the menu.
At about 8:30 AM I had my Solar Burner browning the ground meat for the Taco Soup we were going to make, after which I scrambled a couple of eggs for my breakfast while I had the parabolic at my disposal.
We then got the chicken, onions, sweet potatoes and cabbage and seasonings ready and the taco soup so that we could have them into the Sun Ovens at 9:00 AM, so that they would have a good long time to cook at more moderate temperatures, thus allowing for a more tender chicken.
We then got roll dough out to thaw for our scones and also started baking the first chocolate chip cookies and white chocolate and macadamia cookies, of which we ended up baking about six dozen all together throughout the day.
We baked two trays of peanut butter bars and then topped them with peanut butter and chocolate icing (I liked these a lot)
We also cooked a mixture of onions, green peppers, mushrooms and seasoning and some sugared carrots, cauliflower and broccoli and about a dozen hard boiled (baked) eggs.
Of course we had to pop some popcorn for everyone to try.
About 11:30 the first batch of dough was ready for scones and so we took the Parabolic out to the front of the house, next to the street and commenced to fry up the first three dozen scones for all of the people as they arrived to the demonstration.
Solar Frying Scones is a real attention getter for people who have never seen, much less known about, solar cooking and what is possible with the power of the sun and a solar cooker’s abilities.
After they got their scones they proceeded to the back yard to where all of the other cookers were set up and there they learned about the solar ovens and tried many tasty solar cooked treats.
I fried scones all afternoon and conversed with all of the visitors while my sister, her husband and my wife took care of everything else in the back yard.
The event was very successful and it generated much enthusiasm and interest from the participants.
It was also the first time my sister and her husband were really able to see and experience solar cooking on such a level and it was a great way for them to see how easy it really is to cook this way.
Well, this has been a very busy week of solar cooking, and next week I have another solar cooking demonstration as well as our customary monthly solar cooking class/demo that we do at the store.
Summer sure is a busy time for us, lots of sunshine to take advantage of.
Day by day and week by week solar cookers log
We invite all who would like to contribute to this page to do so. Submit to us your own experiences, events, happenings and gatherings that have anything to do with Solar Cooking and we will post it here for all to share, enjoy and profit thereby.
*You can submit here on the My favorite Solar Cooker Recipes.
Return from Solar Cooking Archive back to home page
Go to:
Solar Cooking Archive #2 The World of Solar Cooking
Solar Cooking Photos
SOLAR COOKER CATEGORIES
Panel Cookers
Box Cookers
Parabolic Cooker
Evacuated Cookers
Accessories
Discontinued CookersNew Financing Options available for purchase of Solar Cookers

©United states Copyright Solar Cooker at Cantinawest
©International Copyright Solar Cooker at Cantinawest
®All rights reserved,reproduction is prohibited without permission
Copyright 2017